
Reliable transfers of 0.2–5 µL depend on one combination: the smallest matching pipette and tip, vertical aspiration with a one-second pause, single pre-wetting, and blow-out with touch-off against the vessel wall. When technique alone cannot hold your coefficient of variation within acceptable limits, dilute to a larger working volume or switch to a positive-displacement pipette. Verify results gravimetrically on a microbalance and calibrate to ISO 8655.
Checklist for accurate micro-volume pipetting
Before touching the plunger, run through these eight checks. Skipping any one of them is where most sub-5 µL errors originate.
- Select the pipette with the smallest nominal volume that covers your target, and pair it with the smallest compatible tip.
- Attach the tip with light, even pressure and inspect it for flash lines or moulding defects before use.
- Pre-wet the tip once, then proceed. At very small volumes below 2 µL, repeated pre-wetting cycles can increase variability.
- Keep immersion depth to roughly 2–3 mm and aspirate with the pipette held vertically, pausing about a second for flow to stabilise.
- Dispense to the second stop for full blow-out, then touch the tip off against the receiving vessel's wall.
- Hold a steady rhythm and consistent plunger speed across a run, and avoid cupping the pipette in your hand between transfers.
- Spot-check accuracy mid-run by weighing several dispenses on a microbalance rather than waiting until the end of a batch.
- If error persists despite correct technique, move to a positive-displacement pipette or dilute the sample into a larger, easier-to-measure volume.
Pro Tip: Run your spot-check weighings on the same balance and in the same room conditions you used for calibration. A microbalance reading taken near an open door or under an air-conditioning vent will drift enough to make a perfectly good pipette look faulty.
Which pipette and tips actually work below 5 µL?
The rule that matters most here is simple: match the pipette's nominal range to the volume you're dispensing, not to whatever unit is already sitting in the rack. For a 1 µL transfer, use a 0.25–2.5 µL pipette rather than reaching for a 10 µL or 20 µL model set near its lower limit, where mechanical tolerances eat a disproportionate share of your target volume.
Air-cushion pipettes work fine for most aqueous samples, but they struggle with anything volatile, viscous, or foaming. Positive-displacement pipettes use a piston that contacts the liquid directly through a capillary, which sidesteps the air-cushion expansion and evaporation issues that plague classic designs. The trade-off is throughput: capillary-piston tips cost more per unit and load more slowly than standard tip racks, so they're best reserved for genuinely difficult samples rather than routine aqueous dilutions.
Tip selection deserves the same scrutiny as pipette selection:
- Check orifice moulding quality under decent light. A rough or slightly oval bore changes the seal and skews aspirated volume.
- Low-retention coatings help with viscous or sticky samples, but some hydrophobic coatings behave unpredictably at sub-2 µL, so test tip performance against your specific assay rather than assuming the coating is always a net benefit.
- Confirm the tip actually seats and seals on the shaft. A loose fit is invisible until you weigh your dispenses and find a systematic undershoot.
A handful of accessories separate a rough bench setup from a controlled one: a microbalance with microgram readability for verification, low-evaporation reservoirs for anything volatile, and filtered tips where aerosol control matters. On the maintenance side, ISO 8655 calls for annual calibration by a qualified service provider, but high-throughput labs shouldn't wait a full year to catch drift. A quick gravimetric spot check every few weeks catches piston wear and seal degradation long before it shows up in failed assays.
How do you pipette 0.2–5 µL step by step?
Micro-volume work rewards a deliberate, repeatable sequence more than any single clever trick. Follow this order every time and you remove most of the variability that creeps in when technicians rush.
-
Set the volume and inspect your equipment. Dial in the target volume, confirm the pipette's display matches, and check the tip cone and shaft for damage. Prepare the receiving vessel so you're not fumbling for a tube once liquid is in the tip.
-
Attach the tip and pre-wet once. Press the tip on with firm, even pressure, then aspirate and dispense the target volume back into the source liquid a single time. This conditions the air cushion to the vapour pressure of your specific liquid. Doing it repeatedly at sub-2 µL, however, tends to introduce occluding bubbles rather than improve accuracy, so one cycle is the practical limit.
-
Aspirate vertically at the correct immersion depth. Lower the tip 2–3 mm below the liquid surface, no deeper, and depress the plunger to the first stop before insertion. Release the plunger slowly and evenly rather than letting it snap back. Pause for at least a second after aspiration to let the liquid column stabilise inside the tip before you withdraw.
-
Withdraw straight up. Remove the tip directly out of the vessel without angling it against the container wall on the way out. Any sideways contact at this stage can wick liquid off the tip or draw in an air gap that changes what's actually aspirated.
-
Move to the receiving vessel and dispense at an angle. Tilt the tip to roughly 45 degrees against the inside wall of the destination tube, press the plunger to the second stop for a full blow-out, and hold there briefly.
-
Touch off and inspect. Drag the tip's outer surface lightly against the vessel wall while still depressed, which reliably strips the last adherent droplet that a blow-out alone won't release. Check the tip visually for any remaining liquid film; if you see one, repeat the touch-off motion once before moving on.
-
Adjust for difficult liquids. Viscous samples need slower aspiration and a longer stabilisation pause, sometimes 3 to 4 seconds instead of one. Volatile solvents evaporate fast enough inside the tip that speed matters more than care. For anything foaming, viscous beyond a syrupy consistency, or prone to evaporating mid-transfer, a positive-displacement pipette will outperform technique refinements every time.
Consistency in plunger speed and rhythm across an entire run matters as much as any individual step in this sequence, because random hand-to-hand variation, not any single mistake, is what usually blows out a CV on repeated transfers.
Why do small-volume pipetting errors happen, and how do you fix them?
Most sub-5 µL failures trace back to a small set of repeat offenders, and each one has a distinct fix rather than a generic "be more careful" answer.
- Wicking from vessel contact. Touching the tip against a tube wall during aspiration or withdrawal draws liquid out by capillary action. Keep the tip clear of walls except during the deliberate touch-off dispense, and check tube geometry if wicking keeps recurring with a particular consumable batch.
- Evaporation during handling. Sub-microlitre volumes have enormous surface-area-to-volume ratios, so even a few seconds of open-air exposure matters. Shorten the interval between aspiration and dispensing, work over chilled racks for volatile reagents, and consider a humidified enclosure for extended runs.
- Occluding bubbles and films. A visible bubble at the tip orifice or a thin liquid film clinging to the inner wall both signal incomplete transfer. Discard the tip rather than trying to recover it. Bubbles usually trace back to over-aggressive pre-wetting or a nicked orifice.
- Tip lot variability. Manufacturing tolerances become visible at sub-2 µL in ways they never do at 100 µL. Inspect new tip lots before running critical assays, log lot numbers against results, and test a small sample set for CV if a batch looks suspect.
- Instrument-level drift. When technique is sound and errors persist, suspect the pipette itself. Worn piston seals, uneven piston travel, and general calibration drift all produce symptoms that look identical to poor technique until you run a gravimetric check.
Manual pipetting variability doesn't scale in a simple linear way from larger volumes down to micro volumes, which is exactly why a technique that performs fine at 50 µL can fail quietly at 2 µL. Treat small-volume work as its own discipline requiring its own verification, not a scaled-down version of routine pipetting.
How do you verify pipette accuracy for micro volumes?
Gravimetric verification is the practical gold standard for confirming what your pipette is actually delivering, and it works on a straightforward principle: dispense water, weigh it on a microbalance, and convert the mass to volume using a Z-factor that accounts for water's density and local air buoyancy at the measured temperature and pressure.
Setup matters more at micro volumes than it does anywhere else in the lab. Microbalances with microgram readability need draft shields to block air currents, evaporation traps or covered weighing vessels to stop the sample losing mass mid-measurement, and enough understanding of the instrument's minimum weight specification to know when a single reading is trustworthy versus noise. A single measurement also isn't enough. Run repeated dispenses to establish actual repeatability rather than relying on one weighing to represent the pipette's performance.
| Verification parameter | Practical guidance for 0.2–5 µL |
|---|---|
| Balance readability | Microgram resolution, with draft shield fitted |
| Weighing vessel | Covered or use an evaporation trap during weighing |
| Number of dispenses per check | Repeated series, not a single measurement |
| Environmental control | Stable room temperature, away from vents and doors |
| Formal calibration cadence | Annual service to ISO 8655 |
| Interim checks | Gravimetric spot checks between formal calibrations |
High-throughput labs shouldn't treat the annual ISO 8655 service as the only checkpoint. A pipette can drift meaningfully within months of heavy use, and a quick interim gravimetric check catches that drift before it contaminates a run of results.
What environmental factors throw off small-volume accuracy?
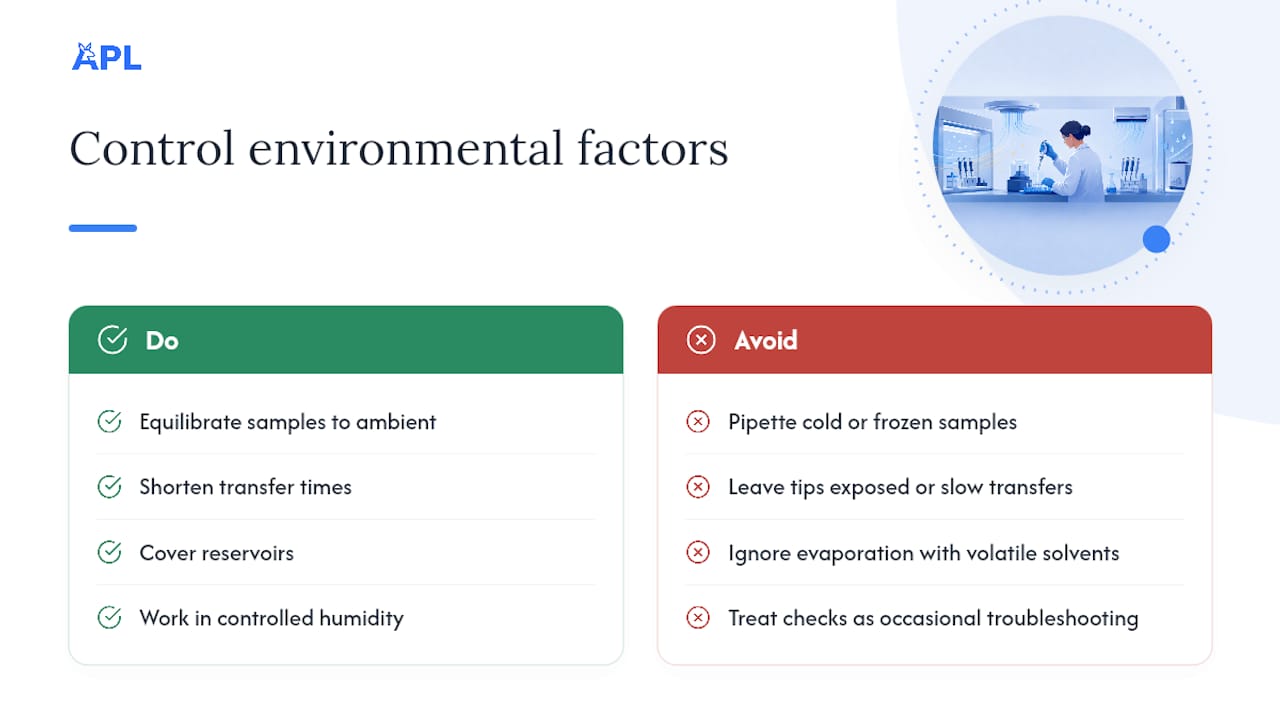
Temperature is the variable technicians underestimate most. A sample straight out of a fridge or freezer has a different internal air pressure inside the pipette's air cushion than one sitting at room temperature, and that mismatch changes the volume actually aspirated. Equilibrating samples to ambient temperature before pipetting removes this source of error almost entirely.
Humidity and evaporation interact in ways that matter most with volatile solvents. A tip loaded with a few hundred nanolitres of ethanol or DMSO can lose a meaningful fraction of its volume to evaporation during a transfer that takes even a handful of seconds too long. Shorter transfer times, covered reservoirs, and working in a controlled-humidity area all reduce this effect.
Sample chemistry itself, particularly viscosity and surface tension, changes how liquid behaves inside the tip. Thick or high-surface-tension liquids flow more slowly and leave more residual film, which is exactly the scenario where a positive-displacement pipette earns its higher per-tip cost. Building these checks into your standard operating procedure, rather than treating them as occasional troubleshooting steps, is what keeps a method reproducible across different operators and different days.
When should you stop refining technique and change your method?
Technique has a ceiling. If your coefficient of variation stays outside acceptable limits after you've confirmed correct pipette selection, immersion depth, and touch-off, the fix is not more practice, it's a different approach.
Three signals should trigger that change: a persistent CV that doesn't improve across repeated attempts, sample chemistry that's inherently volatile or viscous, and a target volume sitting near or below your microbalance's minimum measurable weight for confident verification. In any of these cases, dilute the sample into a larger, more measurable volume, or switch to a positive-displacement pipette.
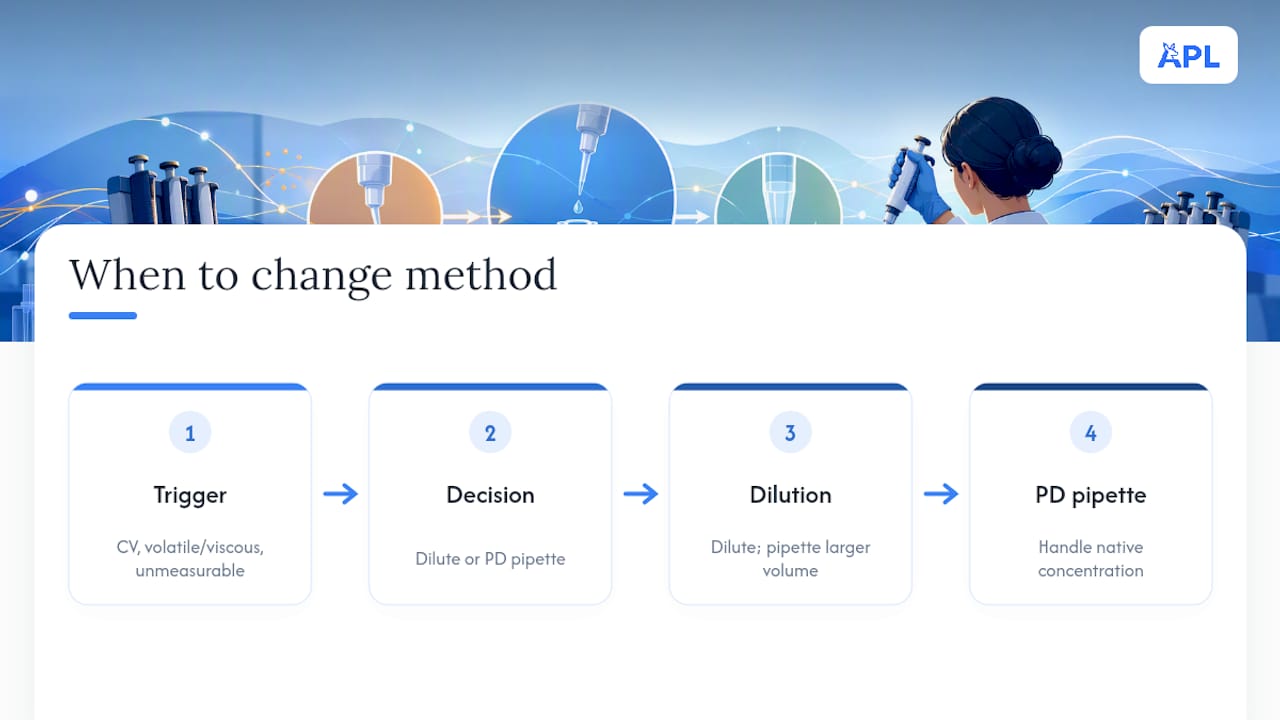
Dilution reduces relative pipetting error but adds its own risk, since each dilution step introduces a fresh opportunity for error. For a PCR master mix where a primer needs to go in at 0.5 µL, diluting the stock and pipetting 5 µL of the diluted version is usually the safer call. For an enzyme assay sensitive to total dilution volume, a positive-displacement pipette that handles the native concentration directly is often the better fix.
Where to find validated methods and lab supplies
Getting the technique right only matters if the reagents behind it are reliable. Aupeptidelabs publishes bench guides covering peptide dilution calculations for labs stepping up from micro volumes to more measurable working dilutions, along with method notes on sterile filtration for maintaining sample integrity through the transfer process.
For labs weighing pipetting against syringe-based dispensing for very small volumes, the insulin syringe guide covers when a syringe is the more practical tool. High-purity research peptides and consumables are shipped promptly from Australia, with third-party purity documentation provided with orders, which matters when your pipetting accuracy is only as good as the reagent going into the tip.
Labs building out a full micro-volume workflow should treat method guides and supply quality as one decision, not two separate problems.
What actually determines success at sub-5 µL
The conventional advice on micro-volume pipetting spends too much energy on exotic fixes, exotic tip coatings, elaborate pre-wetting rituals, specialty reagents, when the evidence points somewhere plainer: consistency of motion and correct instrument selection do most of the work. A technician with a steady rhythm and the right pipette-tip match will consistently outperform one chasing a low-retention coating that may not even suit their assay.
Where the field genuinely underperforms is verification. Plenty of labs calibrate annually and call it done, treating ISO 8655 service as a compliance checkbox rather than a diagnostic tool. Between-service gravimetric spot checks catch drift months before it shows up as failed replicates, and they cost a few minutes on a microbalance you likely already own.
If you take one thing from this guide, prioritise the pipette-tip match and the vertical aspiration pause before anything else. Everything downstream, from touch-off to environmental control, only matters once that foundation is solid. Chasing precision refinements on a mismatched pipette is effort spent in the wrong place.
— Dr. Authur
Sources
This guide draws on manufacturer technique notes from Eppendorf, Gilson, and Thermo Fisher, alongside peer-reviewed analysis of manual pipetting variability and gravimetric verification practice from METTLER TOLEDO. Calibration requirements follow ISO 8655, the international standard governing piston-operated volumetric instruments.
- How to pipette small volumes with handheld manual pipettes — Eppendorf
- Pipetting small volumes: 4 tips for improving your technique — Gilson
- Assessing variations in manual pipetting: An under-investigated requirement of good laboratory practice — PMC
- 10 steps to improve pipetting accuracy — Thermo Fisher
- Microbalances — METTLER TOLEDO